Sometimes your iPhone won’t turn on and it annoys you a lot, because you have been living on it. Here are some reasons for this and ways to save your iPhone from black screen, by Wapolabs!
Why my iPhone won’t turn on – common errors you may encounter
“Why my iphone xr won’t turn on“, “my iphone se won’t turn on or charge“, “my iphone 8 won’t turn on after I replace the screen“. A lot of people have gone through this and it not only causes you time and money but also makes you miss out so many things while trying to fix the problem.
The iPhone is a top-of-the-line product, but it’s just an electronic device anyway, and it’s completely breakable. One of the most common errors iPhone users often encounter is that they can’t turn on the iPhone screen and their iPhone screen goes black, people usually call it “iPhone black screen of death”
Since the iPhone cannot be turned on, there is no way to access the internal system for repair. The simplest solution is to bring them to a repairman or service center. However, if you want to save some time and money, here are some reasons why your iPhone won’t turn on that you can diagnose at home.

iPhone won’t turn on or charge
The iPhone won’t charge in, which is the initial cause of the problem. When the iPhone isn’t charging, it will use its remaining power until it runs out; without a power source, the screen won’t light up.
There are many different causes for this. When there is a problem, the charger is too bad or not authentic. The iPhone charging hole is too dirty and clogged with foreign objects, preventing power from getting to the device and protecting it from the risk of fire and explosion.
iPhone died and won’t turn back on
Many people have experienced situations where their iPhone stopped working all of a sudden. This frequently occurs with older iPhone models, including those in the iPhone 6 to iPhone 8 series and some infamously buggy ones like the iPhone X .
Related article: How to unlock iPhone passcode without computer [7 easiest solutions]
Older models’ sudden shutdown and inability to restart are caused by the hardware not keeping up with operating system advancement, which causes overload and progressively weaker machines. Regarding the “fault king” iPhone X, Apple has admitted that there were problems with the research and development that resulted in a great number of mistakes.
iPhone overheated and won’t turn on
Performance of the iPhone is significantly impacted by temperature. When used in hot climates, the iPhone frequently experiences performance and brightness reductions to the point where the power is shut off and the iPhone won’t turn on.
This explanation is also reasonable. The iPhone will heat up and, to some extent, shut down to prevent the risk of engine explosion, especially when the operating system version is not well optimized or, in most cases, when using the phone in a hot environment, such as in the sun.
iPhone won’t turn on after update
This frequently occurs following significant updates; iOS 16 is the most recent instance. It frequently occurs with older models that aren’t designed for the most recent operating system (new operating systems will be released with an iPhone line, for example, iPhone 14 series and iOS 16 – which will only be best optimized for the previous 2 to 3 iPhone lines).
As a result, the device will be overloaded and defective after updating a new, heavy operating system on outdated machines, in addition to a number of other factors, leading to a crash and malfunction.
iPhone won’t turn on stuck on Apple logo
It’s typically software issues rather than hardware issues that cause an iPhone to become stuck at the Apple logo. Several potential causes include: The software on the phone is faulty; you restored or corrupted transferred files from an iCloud or iTunes backup; the iPhone has been jailbroken, which may have caused some software issues like a boot loop; your iPhone is water damaged – The iPhone is water-resistant, but it’s important to keep in mind that it’s not waterproof.
Related article: iPhone camera and flashlight not working
iPhone stuck on “Verifying update” and won’t turn off
You are prepared to update your iPhone now that iOS 16 has been made available. However, at “Verifying updates,” your phone abruptly stops working for a while. It usually only takes a few minutes at most, but your iPhone has been silent for a considerable amount of time.
There may be bugs on your iPhone or iPad if this process takes longer than an hour for you to complete. Additionally, the lengthy process of verifying an iPhone update is typically caused by a shaky internet connection, insufficient iPhone storage, software bugs, etc.

iPhone makes siren noise and won’t turn on
When the iPhone makes strange noises, check the power and charging related things. The first thing you should check for is an electricity issue. This is due to the fact that an improper electrical problem is usually present in any electronic device that emits an odd buzzing sound. Verify that your charger is the source of the buzzing noise and not your wall outlet.
Dropped iPhone won’t turn on
If you drop your iPhone and it doesn’t turn on, the internal parts of the phone may have been physically harmed. The increased drop resistance of recently manufactured iPhones does not spell doom for users, though. Some components may become loose as a result of hard or delicate impacts, rendering the iPhone useless.
iPhone won’t turn on after charging
No matter how long or how fully charged your iPhone has been, it stops functioning. It’s possible that your iPhone’s battery or charging system have some problems.
Batteries and charging mechanisms may experience a variety of issues, both subjective and objective. A battery that is a fake, has a defect, is of poor quality, or has simply weakened significantly after extended use One of the causes of your battery’s rapid deterioration and the iPhone not working error is poor charging.

iPhone won’t turn on after screen replacement
Your iPhone won’t turn on after you just replaced the screen. It is annoying when one issue is resolved but a new one appears. The simplest explanation for this issue is that your iPhone hasn’t yet gotten used to the new screen.
Related article: No sound on iphone error and 12 most simple ways to fix
If the issue is not too serious, it should only take a few minor adjustments before the iPhone becomes completely accustomed to this entirely new screen companion. Of course, there is a chance that the screen will be replaced with a subpar or outdated screen, which is another factor in the iPhone’s failure to function after the screen replacement.
Way to fix the problems
The best course of action is to start fixing your iPhone as soon as you’ve determined the potential errors that are causing it to stop working. The error will worsen and eventually become irreversible if it is delayed for a long time.
Wapolabs would like to share some easy fixes you can try at home to fix the problem with your mobile device.
Charging issue
Charger issues are one of the most frequent causes of the errors mentioned above. The act of directly supplying the iPhone with power to operate is known as charging. Without power, the iPhone won’t function and will shut down. If it doesn’t turn on, you can not find a solution to the issue.
Make sure that the power coming into the iPhone from its input to its output is of high quality to avoid charging issues. It is possible for the entire charging system to stall due to one subpar component, rendering the phone useless.
Some things you can do are:
- Use a clean, reliable power source to charge your iPhone, for example.
- Use a genuine Apple charger or a high-quality charger from a well-known tech brand like Anker; they all have the best protection for the iPhone’s battery.
- Limit use of your iPhone while charging; charge it in a cool, stable environment, and don’t wear a case while doing so.
- Clean the charging port: Foreign objects or dirt may partially or totally obstruct the charging process, resulting in unstable power transmission.

Genuine Apple charger
Hard reset your iPhone
In order to restart the device and iOS software to the manufacturer’s original state when the iPhone won’t turn on, a hard reset of the iPhone is a common solution to software issues.
You can choose a hard reset method for your iPhone that won’t cause you to lose any data at all, so don’t worry about it. You should hard reset your iPhone because it will help to extend the life of the device in addition to fixing slow errors that are not visible on the screen.
There are a total of 3 ways to Hard reset iPhone
- Method 1: for iPhone 8 series to present (iPhone 14 series).
- Method 2: for iPhone 7 and 7 plus series.
- Method 3: for iPhone 6 series and below (including SE 1st generation)
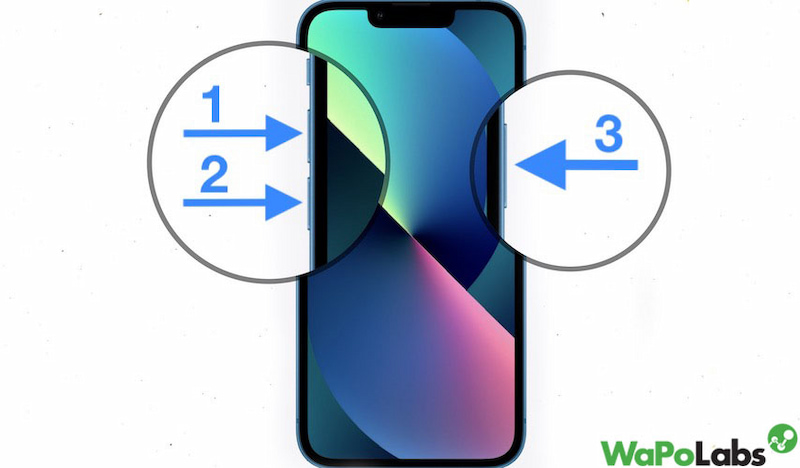
Method 1: Hard reset iPhone 8 to present (iPhone 14 Series).
Step 1: Press and quickly release the volume up button
Step 2: Quickly press and release the volume down button
Step 3: Press and hold the right power button
Step 4: Hold the power button on the right until the apple logo appears, then release
Keep holding the power button until the Apple logo appears. Hold for too long and the device will enter recovery mode. After the Apple logo appears, wait for a while for the device to restart. Once the device turns on, you have successfully Hard Reset.

Method 2: Hard reset iPhone 7 and 7 Plus
For the iPhone 7 series, the hard reset is a bit different, but it will be simpler than the newer models.
Step 1: Press and hold the volume down and power buttons together
Step 2: Release your hand when the apple logo appears
After the apple logo appears, wait for a while for the device to restart. Once the device turns on, you have successfully Hard Reset.
Method 3: Hard reset from iPhone 6 or earlier (Including SE 1st generation)
Step 1: Press and hold the volume down and power buttons together
Step 2: Release your hand when the apple logo appears
After the apple logo appears, wait for a while for the device to restart. Once the device turns on, you have successfully Hard Reset.
Other problem related to iPhone: iPhone flashlight not working – 12 best solutions to fix it
Notes when Hard Reset iPhone
Hard reset does not lose device data, once the hard reset is complete, you just pick up the device to use it normally, without losing passwords, music, photos, … For the longest smooth phone experience, you should hard reset once a week.
Restore with iTunes
At some point while using the phone, especially when dealing with serious software errors, we will run into a situation where we need to restore the iPhone to how it was when it was first shipped. This will facilitate a nearly complete machine erase and empty. Restoring the system settings to a fresh, factory-like state involves wiping out all of the current data.
Here are the steps to Restore with iTunes:
Step 1: Download and launch iTunes on your computer.
Step 2: Use a cable to connect to your iPhone and computer. After successful connection, open iTunes and click on the phone icon.
Step 3: If you don’t need to back up your data, click Restore iPhone… If you need to back up data, select Backup Now. Under Automatically Back Up, select iCloud or This Computer.
Step 4: Click Next.
Step 5: Click Agree and wait for the process to complete.
When the device is turned back on and iTunes is still connected. Please choose one of the 2 options provided below:
– Set up a new iPhone: Install from scratch as a new phone.
– Restore from this backup: Restore with the created backup.
Thus, the iPhone restore process is complete.

Restore in DFU mode
When you forget the screen unlock password or your device crashes and cannot power on, you will need to restore your iPhone through DFU mode.
Here’s how to restore an iPhone through DFU mode.
First, you need to pre-download the latest firmware on your iPhone here. You need to find the correct iPhone model you are using and download the latest firmware.
Case 1: Your device does not have “find your phone on iCloud” turned on
Step 1: Turn on DFU mode on iPhone.
Connect iPhone to the computer. Press Power and Home at the same time for 10 seconds. Release the Power key, continue to hold down the Home key until a new message appears on the screen. Release the Home key. Now the iPhone screen just a black color, and show nothing
Step 2: iTunes notices Restore iPhone. Restore.
Step 3: Shift + Restore iPhone.
Step 4: Find the path to save the firmware.
Step 5: Wait for the update to install and restore.
Case 2: Your device has “find my phone on iCloud” turned on
Go to the website: icloud.com. Sign in to your account. Find iPhone. Select the name of your current iPhone. Erase iPhone.
Then operate normally as the steps in case 1.
So you’ve restored the iPhone through DFU mode.

Check for physical damage
Have your iPhone checked for hardware damage if you recently dropped or bumped it. Be cautious because not every iPhone X, iPhone 8 is as robust as an iPhone 14 Pro Max. Inspect the outside of the device for flaws and have them fixed as soon as you can because they might get worse.
Check if it has liquid inside
As mentioned, the iPhone can be water resistant, depending on the model with different water resistance standards, but not waterproof. Water in the machine will short circuit and damage electronic equipment.
Don’t worry this will continue silently because the iPhone will notify you immediately if there is liquid in it. To protect your iPhone and accessories, stop using the charging and accessory connection until the Lightning port and accessory are dry.
Some things you should keep in mind:
- Do not dry your iPhone with an external heat source or compressed air.
- Do not insert foreign objects, such as cotton swabs or tissues, into the Lightning connector.
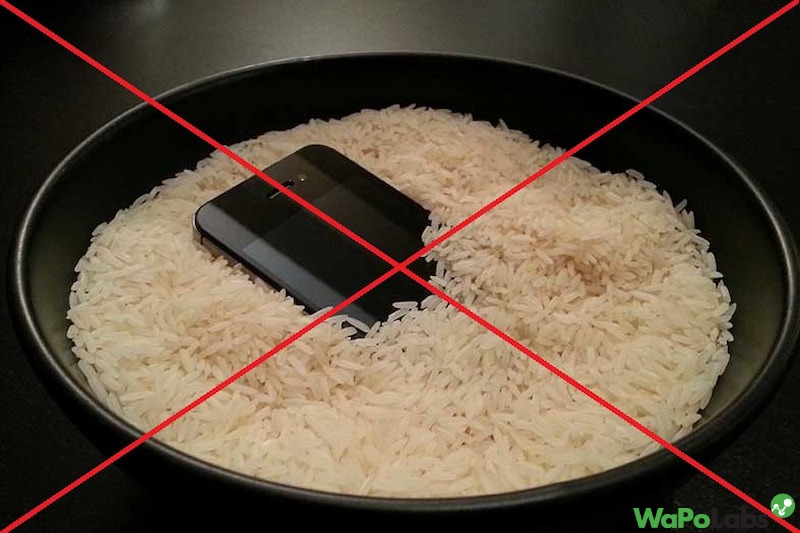
- Don’t put your iPhone in a bag of rice. Doing so may let small grains of rice damage your iPhone

Don’t put your iPhone in a bag of rice
Contact Apple support
Call Apple Support if none of the aforementioned fixes succeed and your iPhone won’t turn on. You can expect top-notch customer service from Apple, personalized attention from those who understand the iPhone the best, and genuine equipment from the manufacturer. You won’t need to be concerned about subpar goods.
Wapolabs USA
- Address: 1301 K Street NW Washington, D.C., U.S. 20071
- Phone: 0190-8286
- Email: [email protected]
- Website: https://www.wapolabs.com
- Instagram: https://www.instagram.com/wapolabs/


